

HOW DO I CONNECT TO THE PTX MINECRAFT SERVER?
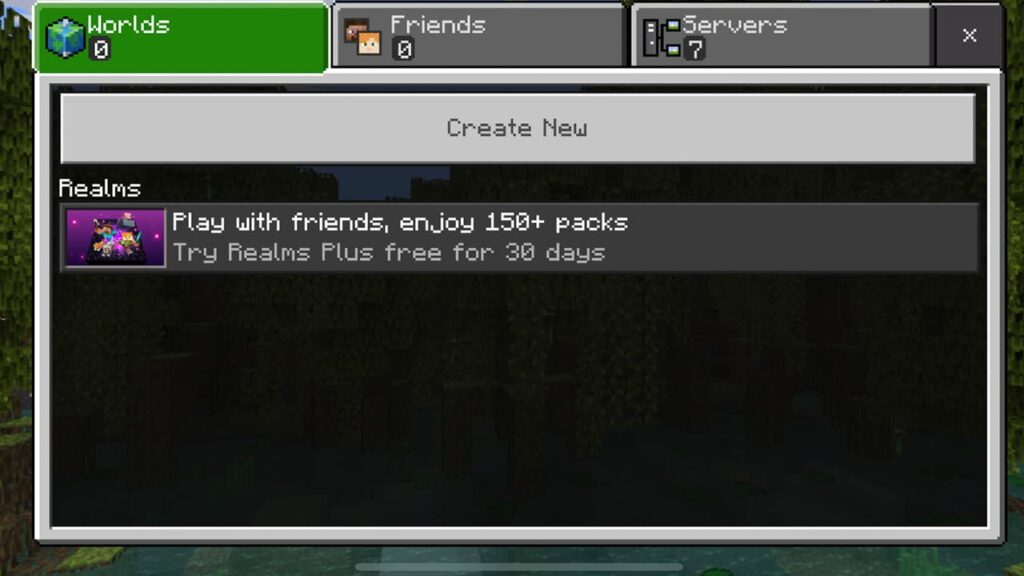
To connect to a Bedrock Edition server, start Minecraft and hit “Play” in the main menu. This will take you to a screen with three tabs: “Worlds”, “Friends”, and “Servers”.
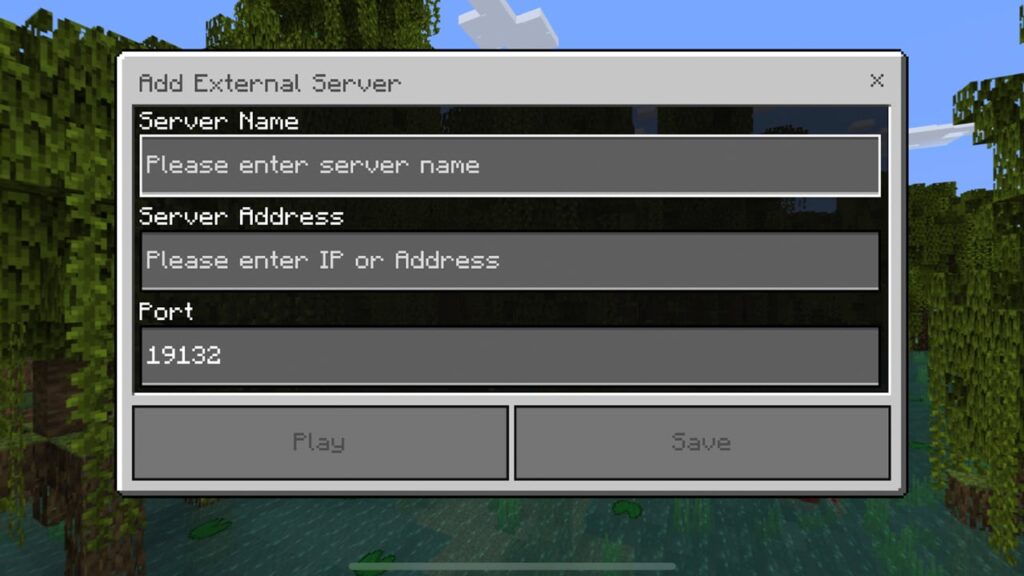
Scroll to the bottom of the list in the servers tab and then hit “Add Server”. Type in “Protex” under name, “play.ptxgames.com” under address, and make sure port is set to 19132, and then either hit “Play” to connect directly, or “Save” to add it to your server list so that you can join it more quickly in the future.
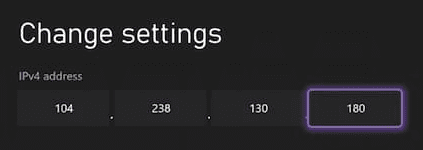
Players using Xbox to join Bedrock servers will need to follow a specific configuration on their console. You’ll be changing the DNS settings of the system. This involves you editing the IP address of your primary DNS server to 104.238.130.180. Keep this in mind when following along below to play with others on Minecraft Bedrock Edition. Besides this, these changes won’t interfere with other games, but you can revert the addresses if you want.
- Open your Xbox settings, then click General and select the Network Settings option.
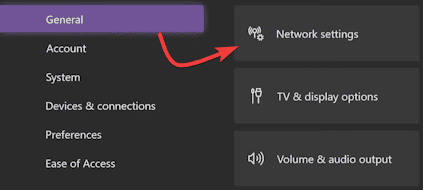
2. Go to Advanced Settings and choose the DNS Settings option, then press Manual.
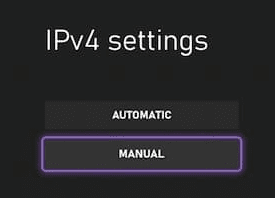
3. Begin to tweak the Primary IPv4 Address to 104.238.130.180.
4. As for the Secondary IPv4 DNS, enter 8.8.8.8 or 1.1.1.1 for its field.
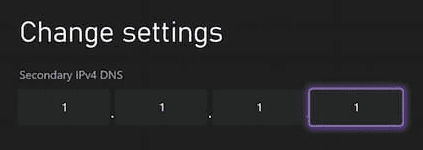
5. Save these changes so the console can perform a connection test to confirm it works. Finally please restart your xbox.
Where to enter the server ip address
After completing the DNS setup on your console, you still need to enter the actual server name. This is the same process on both Xbox and Nintendo Switch. The DNS change only gives you access to the server browser; you still need to enter play.ptxgames.com and port to connect (19132 is our default server port).
- Open your Minecraft application and click Play from the main menu.
- Afterward, head towards the Servers tab and join any featured one.
- Once in-game, click Connect to a Server from the new menu that appeared.
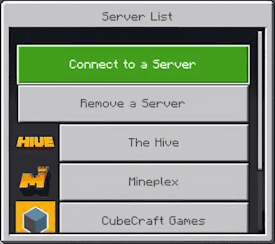
4. Continue to enter play.ptxgames.com and Port accordingly.
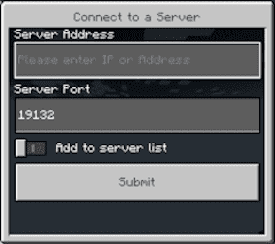
5. Toggle the Add to Server List option and press Submit to begin playing on the server.
Similar to the Xbox setup, you’ll be editing the DNS settings of your Nintendo Switch system. This means you must change your primary DNS server to 104.238.130.180 and use it accordingly. Keep in mind that these changes won’t negatively affect other games when playing multiplayer. When you’re ready, review the steps below to get started with this process.
This method also works on the Nintendo Switch 2, which supports the same DNS configuration through its network settings.
- Head towards your System Settings from the home screen on your console.
- Afterward, scroll down and select Internet and click Internet Settings on the right.
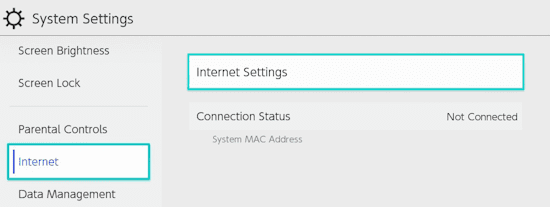
3. Wait for searching networks to stop, then press on your currently used one.
4. In this new area, click Change Settings and switch DNS Settings to Manual.
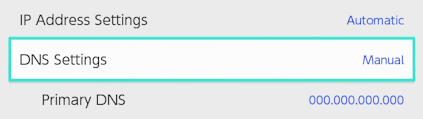
5. Proceed to enter 104.238.130.180 for the Primary DNS option.
6. Do the same for the Secondary DNS settings. but use 8.8.8.8 or 1.1.1.1 instead.
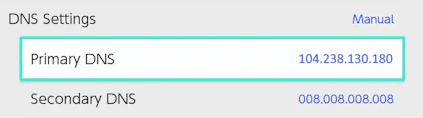
Note: Make sure to include zeros where applicable for this to work.
7. Once you’re finished, click Save on the right and you’re ready to go.
Where to enter the server ip address
After completing the DNS setup on your console, you still need to enter the actual server name. This is the same process on both Xbox and Nintendo Switch. The DNS change only gives you access to the server browser; you still need to enter play.ptxgames.com and port to connect (19132 is our default server port).
- Open your Minecraft application and click Play from the main menu.
- Afterward, head towards the Servers tab and join any featured one.
- Once in-game, click Connect to a Server from the new menu that appeared.
4. Continue to enter play.ptxgames.com and Port accordingly.
5. Toggle the Add to Server List option and press Submit to begin playing on the server.

Step One: Use The url below
play.ptxgames.com

Step Two: Join the Community
Participate in our user forum to share tips, plan events, and build friendships with other employees on the server.

Step Three: Climb the Leaderboard
Monitor your in-game progress and compete with peers as you strive to top our dynamic player rankings.
Explore Our Minecraft Server Features
Discover the unique ways we foster community and fun for our employees through our dedicated Minecraft server.


Getting Started Guide
Learn how to connect to our server with step-by-step instructions for a smooth start.

Community Forum Access
Engage with fellow players, share tips, and discuss all things Minecraft in our active forum.

Leaderboard Highlights
Track player achievements and see who’s leading the pack in our dynamic leaderboard.

Join Our Minecraft Community Today
Connect with fellow employees on our dedicated server, discover how to join, participate in forums, and climb the leaderboard for ultimate recognition.